The Habeetat Planner has a multimodal interface, allowing users to perform the same operation
in different ways, accessing the same functions from different menus.
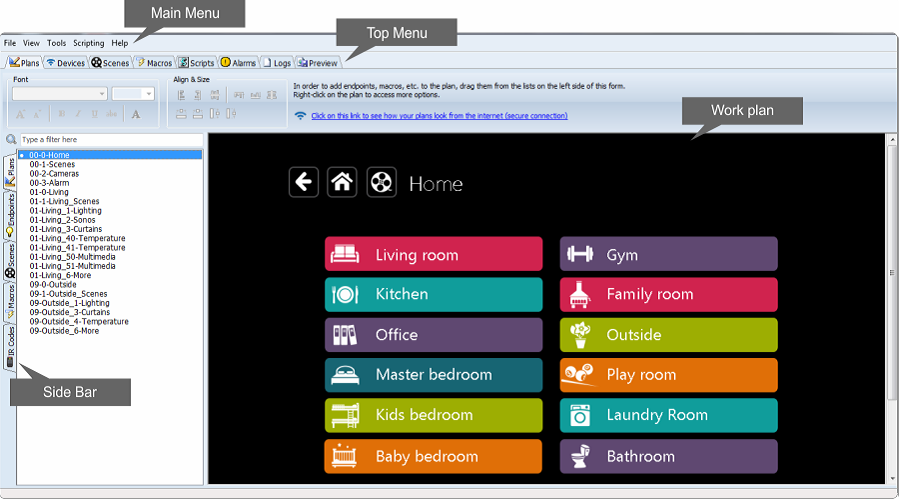
On Designer screen you can identify three menus and a work area:
· Main menu: you can browse the action flaps of the Superior Menu by going to View.
· Scripting, allows to manage programming files. The drop-down Tools menu has options for
maintenance, preferences and additions to the application. Finally, the Help menu, also
accessible from F1, allows to access the online help.
· Top Menu: This menu tabs allow you to edit and manage the configuration of your
installation. From here you can design and edit plans, register and configure the device
functionality, create scenes, programming macros and scripts, set alarms, view logs and
check the notifications you make in a Preview.
· Sidebar: These tabs allow you to visualize on the screen side, items that you create or being
discharged. With a simple "drag and drop" about the work plan, you can enter these
elements in the drawings.
· Work plan: here you can compose the Plans, or screens, which installation requires. The
area or work plan, stated in his left hand with Sidebar that allows access to system
components: Plans, Endpoints, Scenes, macros and IR codes.
Designer: home screen.
 Note: The screens are optimized
for viewing at a resolution of 1024 x 680 px. (IPAD).
Note: The screens are optimized
for viewing at a resolution of 1024 x 680 px. (IPAD).
Plans can also be considered screens, are navigable websites. The Designer module of Habeetat Planner application allows us to design, edit and configure the plans or screens that
the user navigates to control installation.
By default, new installations bring 20 plans, simulating a typical home installation. These plans
can be edited and / or deleted depending on the design you intended for the new installation.
 Important: The "files" generated by the Habeetat Planner need not be saved because the
changes are done automatically at installation. For this reason the File menu only allows you to
execute the Quit action.
Important: The "files" generated by the Habeetat Planner need not be saved because the
changes are done automatically at installation. For this reason the File menu only allows you to
execute the Quit action.
 Sea Also: